

How To Apply Eyeshadow (A Beginners Guide)
There are two kinds of women- one who struggles with eyeshadows (that’s practically every woman) and the others who do not (they are just blessed souls). Jokes apart, doing your own eye makeup and getting away with it is not everyone’s cup of coffee.
You can see so many amazing eye makeup tutorials on Instagram every day but the moment you hold the brush in your hand you don’t know how to start. While getting those million dollar eye look may not be so easy in the beginning but you can definitely reach there with time and practice. The key is to start with simple looks and master your way to those intense dramatic eyes.
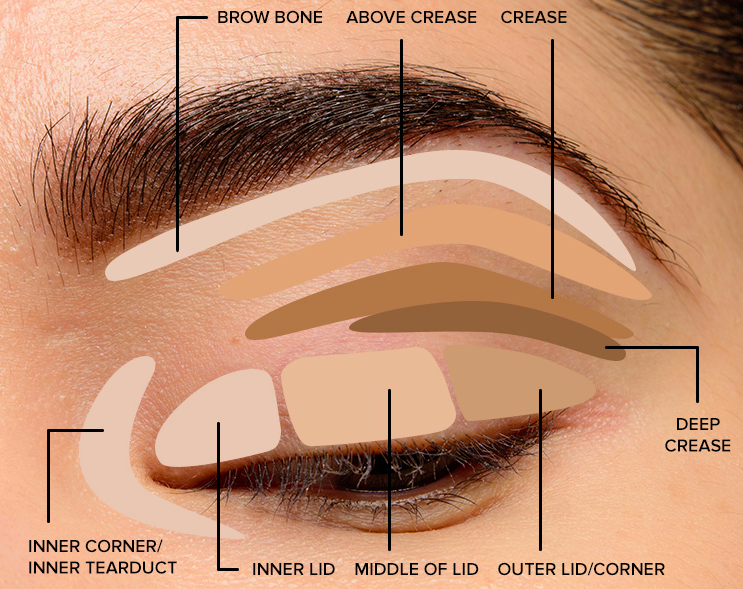
Learning The Lingo
While knowing what part of your eyelid is called what has nothing much to do with getting good eye makeup done, it is necessary that you understand the lingo to follow any tutorial. So, the next time someone asks you to put on some color on the crease of your eye, you will actually know what the hell is a crease.
Tools You Need
Surprisingly there is not much you need to get a simple eye look done. You will need:
A medium eyeshadow brush
A pencil brush
A primer
An eyeshadow palette
An eyeliner
A mascara
Your fingers
And you are ready to go!!!
Also Read: 10 Simple Ways To Style Your Hairs In A Ponytail
How To Apply Eyeshadow
To get the right long-lasting look you need to know which brush strokes to use.
First, apply the eyeshadow by patting it on the lid rather than brushing it across. This will ensure that you do not get a patchy appearance.
For blending the eyeshadow, do not brush back and forth across your eye in a fast motion, use short, slow brush strokes in the same direction to blend colors. Never move your hand in a fast motion to apply the pigments or to blend them together.
Start Your Eye Makeup
Step 1: Priming Your Eyes
Primers are probably the most ignored makeup product. However, using a primer is great to make your hard work last. Using a primer before starting ensures that the makeup stays on for longer. You need it especially in summers or if you have oily skin as your eyelids may get all greasy and the colors may run off or fade out quickly.
Applying a primer is quick and simple. Just dab on a little primer on your lids using your fingers. You can also use a Q-tip or a brush for application. I prefer using my fingers as it is quick and easy.
Step 2: Give A Neutral Colour To Your Lids
Choose a neutral shade to cover your eyelids. Don’t go for the lightest or the darkest color. Use the eyeshadow brush to apply the color. Apply this color to cover the entire lid up to the crease. This neutral base is the main shadow base which is used to build the rest of the look.
The Cheat Sheet
The lightest color usually works well as a brow bone highlighter.
The second-lightest color looks good on your lid.
The second darkest color is for your crease.
The darkest color is for the outer corner.
Also Read: How To Get Rid Of Tanning Naturally?
Step 3: Contour The Crease
Now use the second darkest shade to contour your crease. Start from the inner side of the eye with a thin line and make it thicker as you move to the outer side of the crease. Now use a windshield wiper motion on your crease to blend the colour and avoid any harsh lines. If you have only a 3-color palette, instead of the second darkest go for the darkest color. For a 4-color palette, choose the 3rd darkest.
Step 4: Add Some More Colour
Now apply the darkest shade on the outer V corners. Do not hesitate to make a defined “V” shape at the beginning as you can eventually blend it out. If you want a smokey effect gently extend the color past your crease. Use the same color on your lower lash line as well. Use a brush to blend out the color.
If you find the look too bold you can use the nude eyeshadow (in step 2) to blend out the edges of the darkest eyeshadow for a softer effect.
Also Read: 20 Beauty Myths You Need To Stop Believing
Step 5: Use The Highlighter
Take the lightest color in your palette and blend it in just above your crease up to the brow bone. Now blend, blend, and blend. Ensure that there are no harsh lines anywhere, the colors should seamlessly blend into each other.
Use your pinkie finger to apply a little of the lightest color on the inside corner of your eye. Just press your pinkie into the inside corner of your eye. This makes your eyes look wider and awake.
Step 6: Define Your Eyes And Amp Up The Lashes
Use a kohl pencil to line your lower lash line and blend it to get a softer look. Use some mascara to get some thick long lashes.
Also Read: Your Guide To The J-Beauty Trend
Tips And Suggestions
1. Use a gel or waterproof eyeliner to prevent the product from smudging or any transferring.
2. Finish your eye makeup first and then move on to your face makeup. So that you do not spoil your makeup due to any eyeshadow fallout.
3. Use a shadow and mascara shield to hold under your eye as you apply or just stick tape to your face below the lower lash line to avoid fallout on your face.
4. Use a pencil brush to define the crease and blend it with a fluffy brush.
5. Creamy eyeshadows are more prone to forming creases and the loose powdered ones are difficult to work with. Choose the compact powder eyeshadows for the best results.
6. If you have hooded eyes, practice applying makeup with your eyes open instead of closed so your crease colors are actually visible.
7. Make sure to clean your brushes during transitions.
8. When applying, tilt your head up and look down into the mirror to get a clear view.
Browse through the beauty section to go through my simple beauty tips and tricks or follow me on Instagram to get your daily dose of beauty.
Have a suggestion? Please leave a comment.

